ScaleBirds

ScaleBirds, Home of the 63% Scale Hellcat replica kitplane project.

Gravity always works

Hey there. We are still at it. Time to get you an update. Some great progress and a setback or two to discuss. In early October, we ran the engine a couple more times after the first start and were trying to adjust our idle setting in the carb. Paul stopped by and was mentioning that all the engineering calcs were not finalized because we needed a good weight and balance. Well, we need to start sending our calcs out for review prior to the flight test program. That is coming soon!

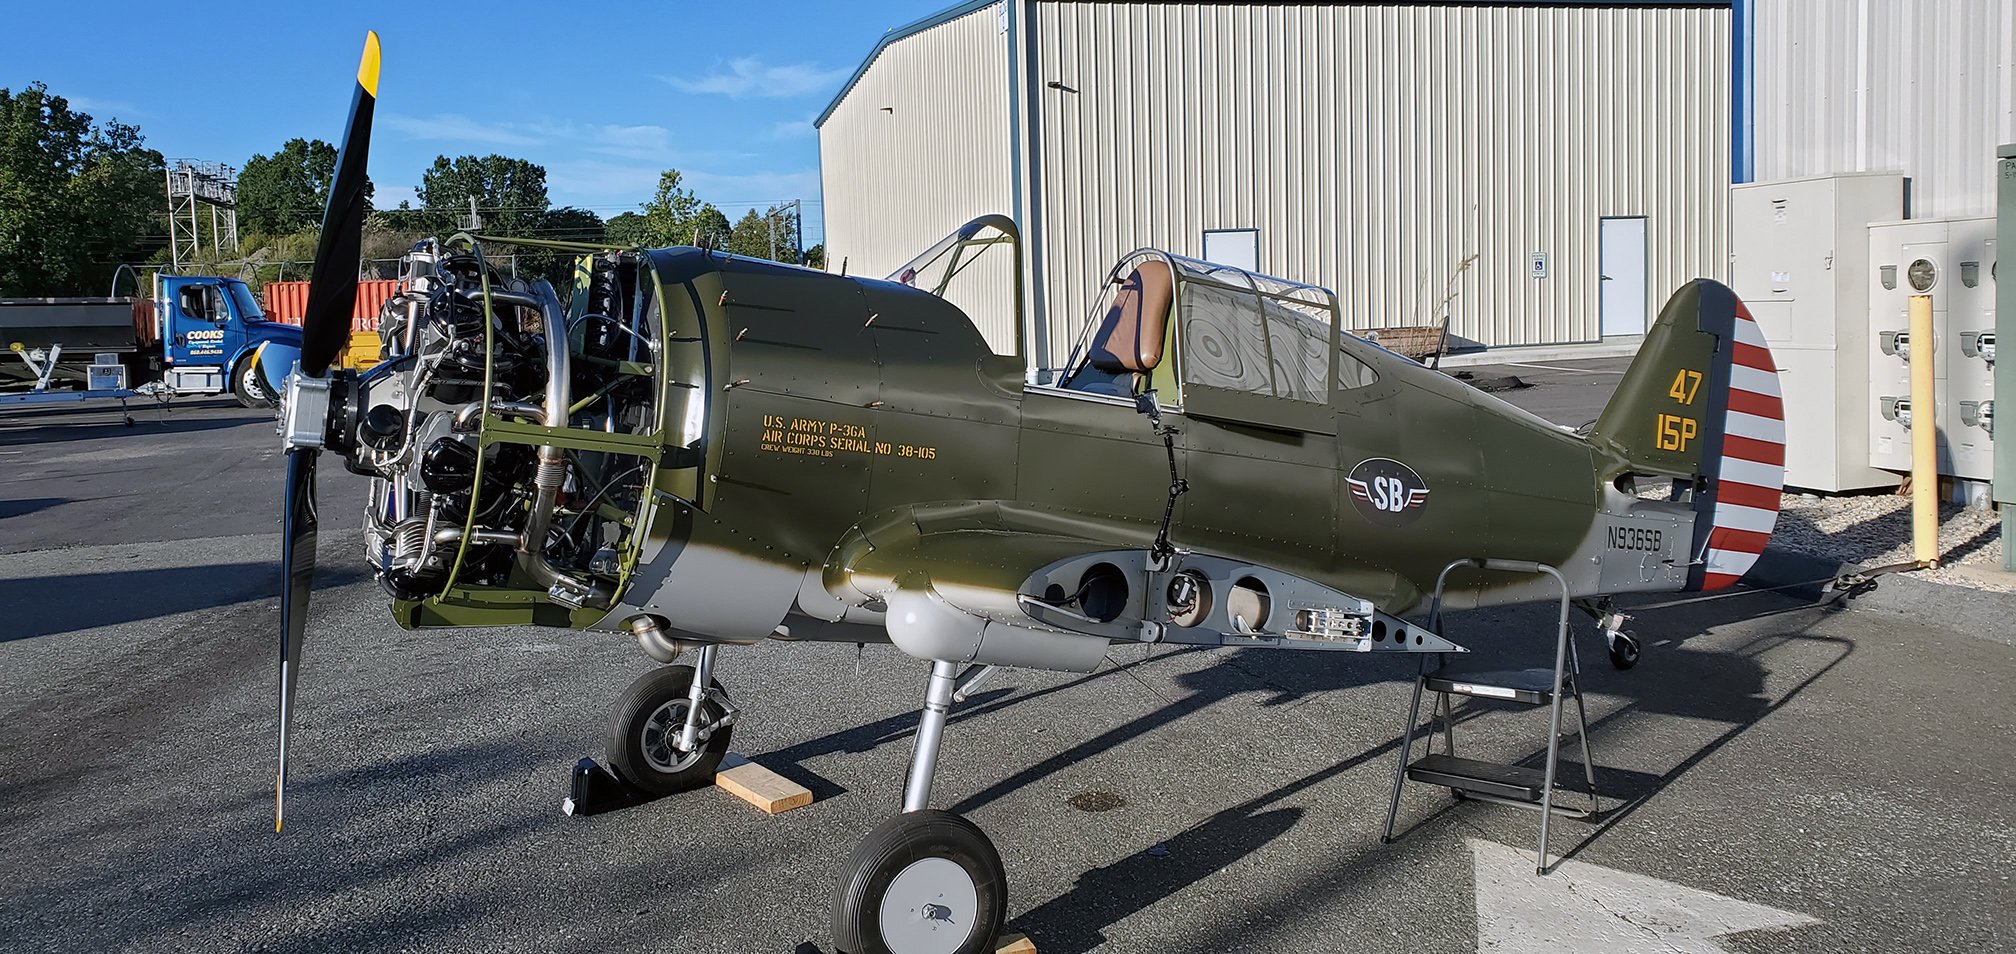
So, that changed the priorities and the second week of October we stopped doing the engine runs. We shuffled the shop around again and setup the plane to have everything on it. After Oshkosh, we left the tail and wings off because the mounted tail will not fit in the trailer. We were planning to take the plane to the airport and so reinstalling would have been wasted effort. But with the new mission, the wings went on, tail went on, all the fairings and the cowling and we drained the fuel tanks. We pulled out our industrial scales and made plywood pads the same height - so we could park the plane on the pads, then roll it onto the scales without changing attitude or anything. Paul got to supervise the effort and he logged the data. We did weights at a parked (inclined) position and then in horizontal level flight attitude - with and without a pilot. This gave us the data for a 3D location for CG (Center of Gravity). A recurring error was happening during the testing. The right (starboard) main gear weight kept fluctuating. So we did the tests by swapping the three scales. We then threw out the oddest set of numbers for each wheel location Like a 20 pound difference. Guessing that it has something to do with the spring loads in the landing gear legs. Pretty weird tho. We are going to do another final weight and balance shortly when the aircraft is ready for inspection. These initial numbers are good enough for the calculations as they have plenty of safety factor. Our empty weight came out to 837 pounds after taking the oil into account. 848 with oil. Heavier than planned, but not terrible for the design. We do have plenty of areas where we can optimize structure to reduce the kit version empty weight. But this is a prototype and it is what it is. CG location was “in the zone”, confirming our decision to go with the heavier and more powerful 7 cylinder engine. At first blush, a 250 pound pilot and full fuel is still in our initial calculated cg range with no ballasting fore or aft. Flight testing will determine how heavy a pilot we can handle in this particular airframe. We are pushing for a crew and bags weight allowance of up to 330 pounds. Real Americans are not as light as they used to be. For comparison, a real P-36/P-40 has a 200 pound max. crew weight.

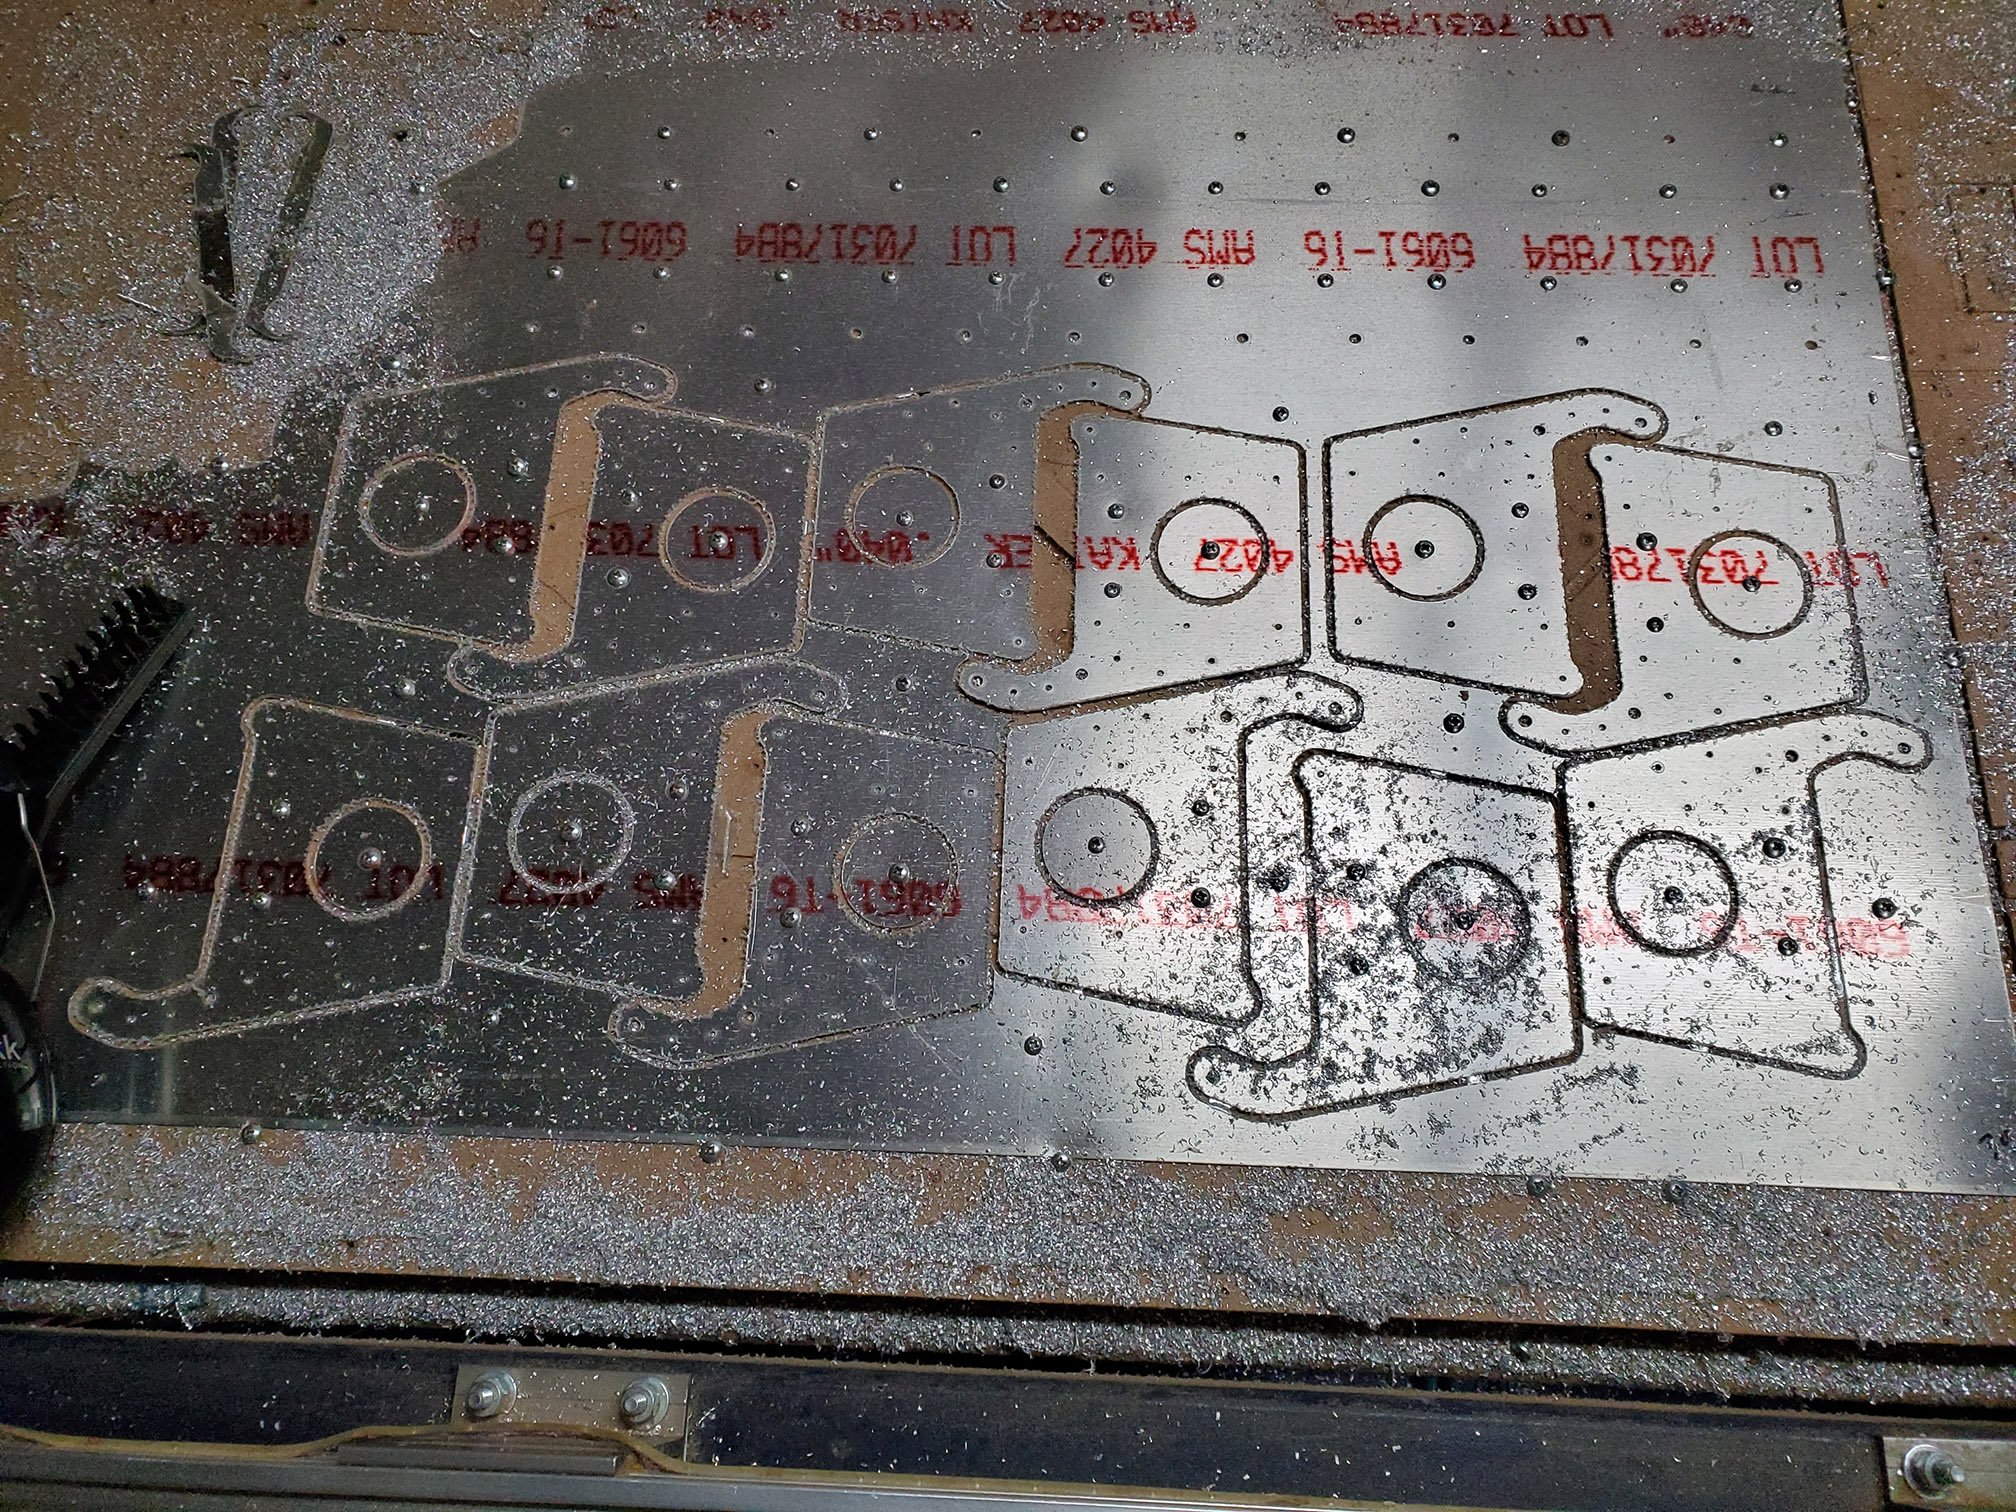
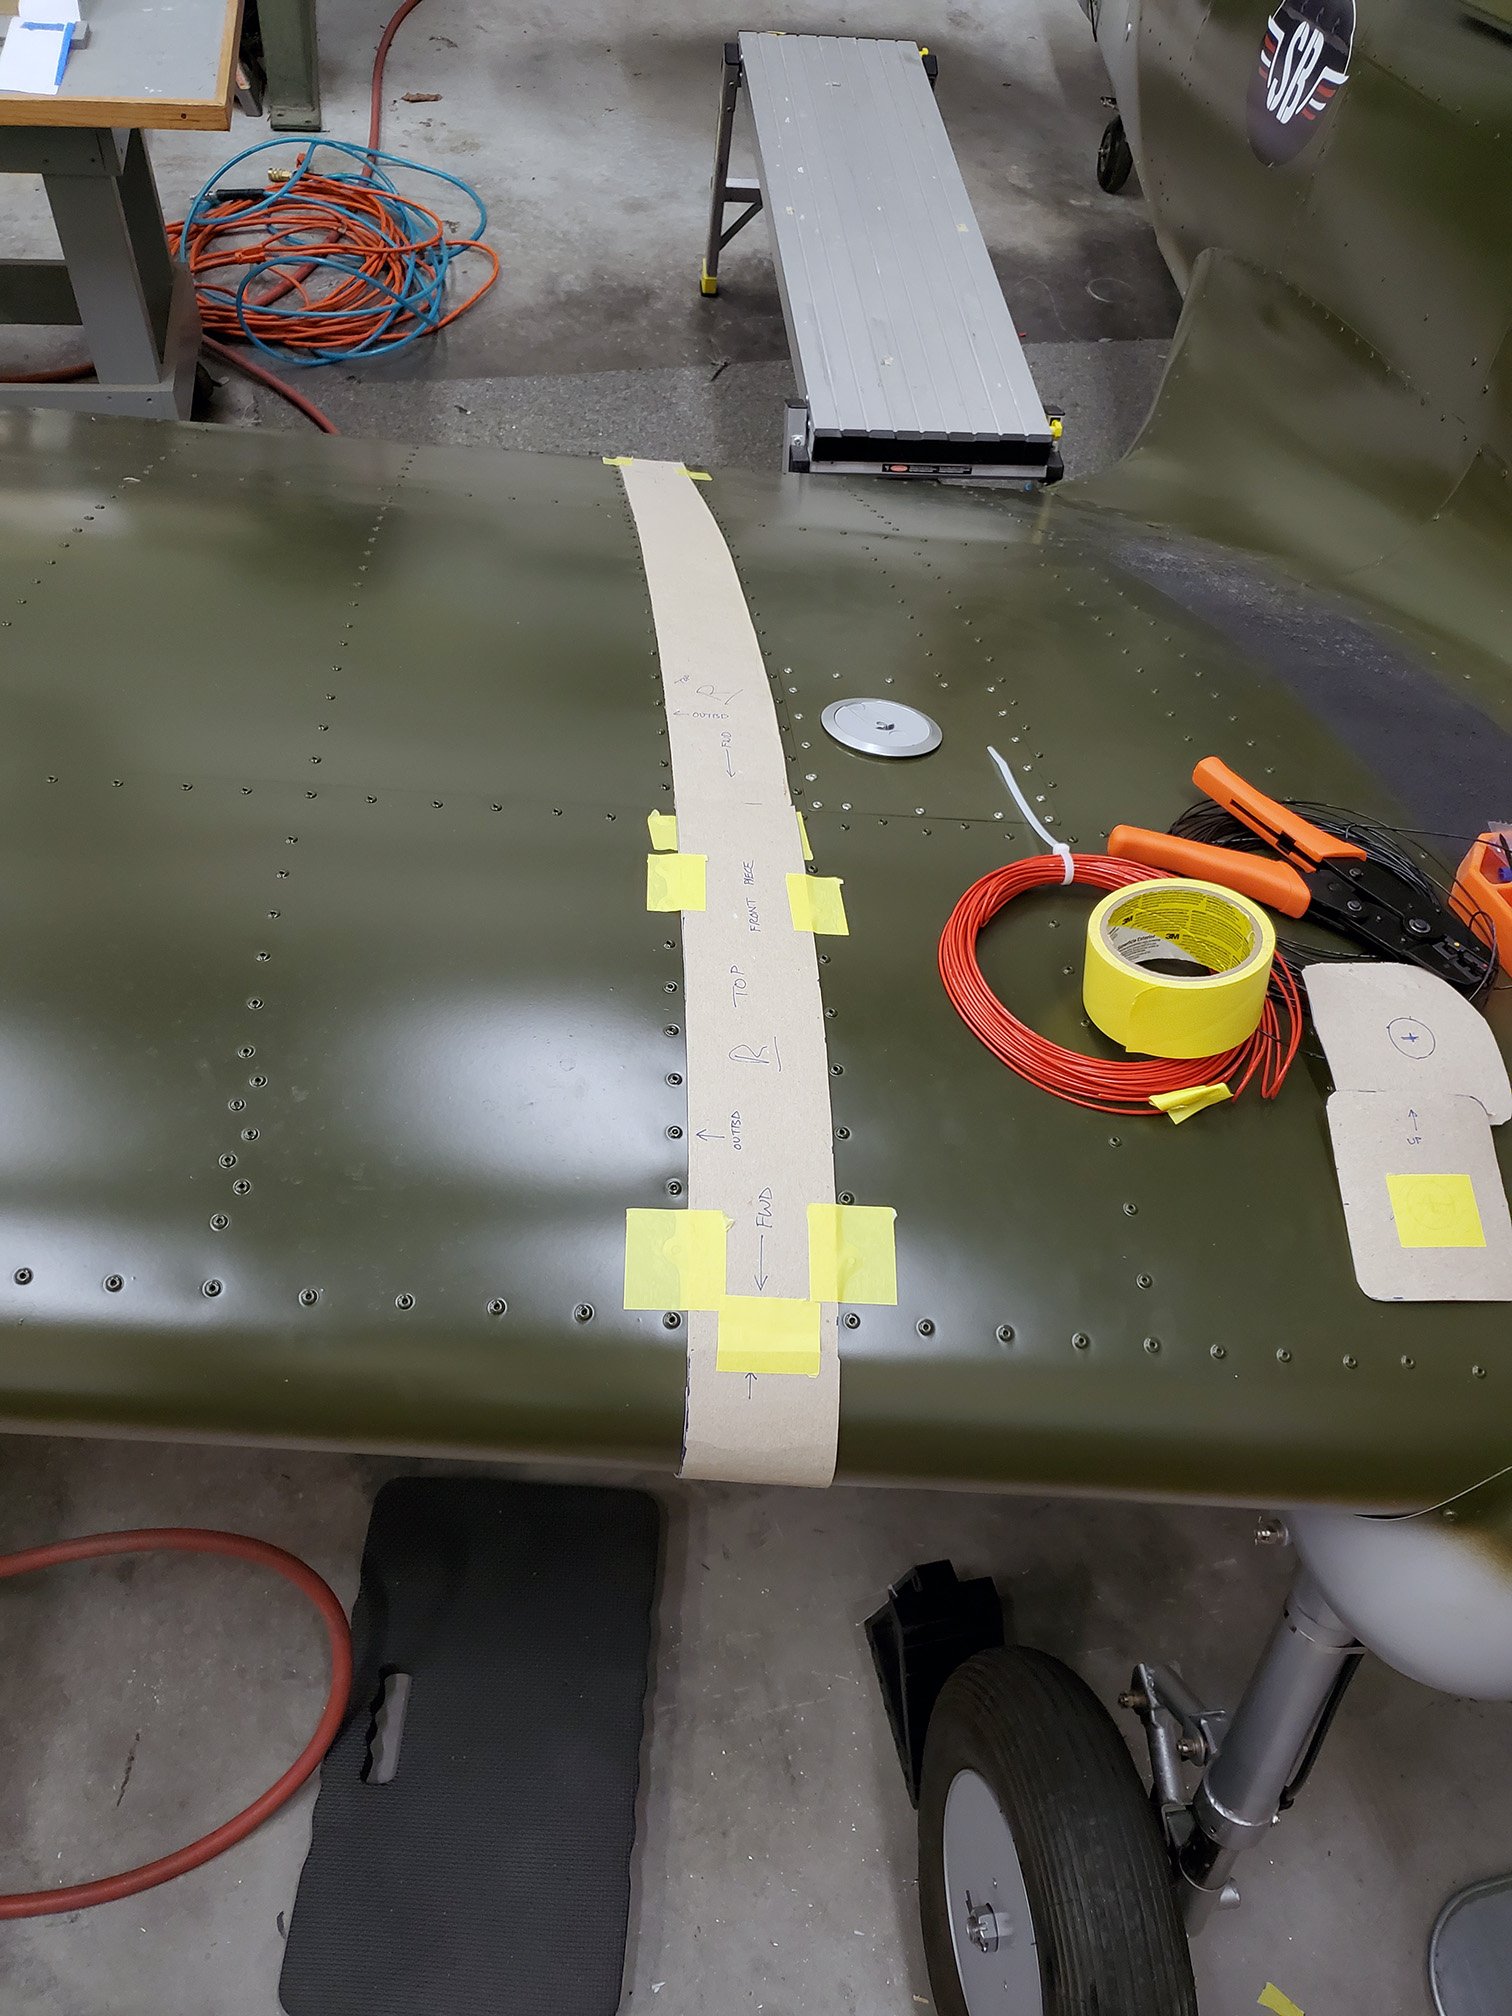
After the testing, we worked on wing gap strip templates and design. Going with a fixed trailing edge and tensioning the front of the strips to the forward false spar just behind the leading edge of the wing. Then a cap will cover the front at the leading edge. We will only have a few screws to secure it from sliding or vibrating out of alignment. Still waiting for time on the router table to cut them out, so they are not finished as of writing this. Very simple so they should be quick to fab and install. Likely at the hangar right before inspection.

We then took a serious look at the landing gear legs. We noticed that when we got the plane to Oshkosh, it had toe-in again. Our thinking was the scissor links were bending as the forks were thin material. The toe-in was even worse after pulling her out of the trailer back home. So the trailer ride really must have over-g’d the landing gear. The roads are terrible and we had the heavier engine this time. Our plan was to remake the scissor links all together and make them billet and stout to fix the toe-in. Well, upon further study, we found that the axles were bent. Not good as they are welded to the lower gear legs. A few people at Oshkosh mentioned the landing gear looked insubstantial and should be beefed-up. We agreed to that for the kit version. Well, now we have a serious problem with this airframe and we pushed-up the landing gear re-design to the second half of October. We studied the available wheels, tires, tubes, axles and brakes and settled on Matco 600F wheels and brakes with 600x6 tires. Had to also redesign the lower gear legs to fit the Matco 1.25” diameter axles that bolt-on with the internal caliper brakes. We are expecting delivery this week. We will set the dimensions and then mill the parts and get them swapped-out as soon as possible. I want to taxi this thing!

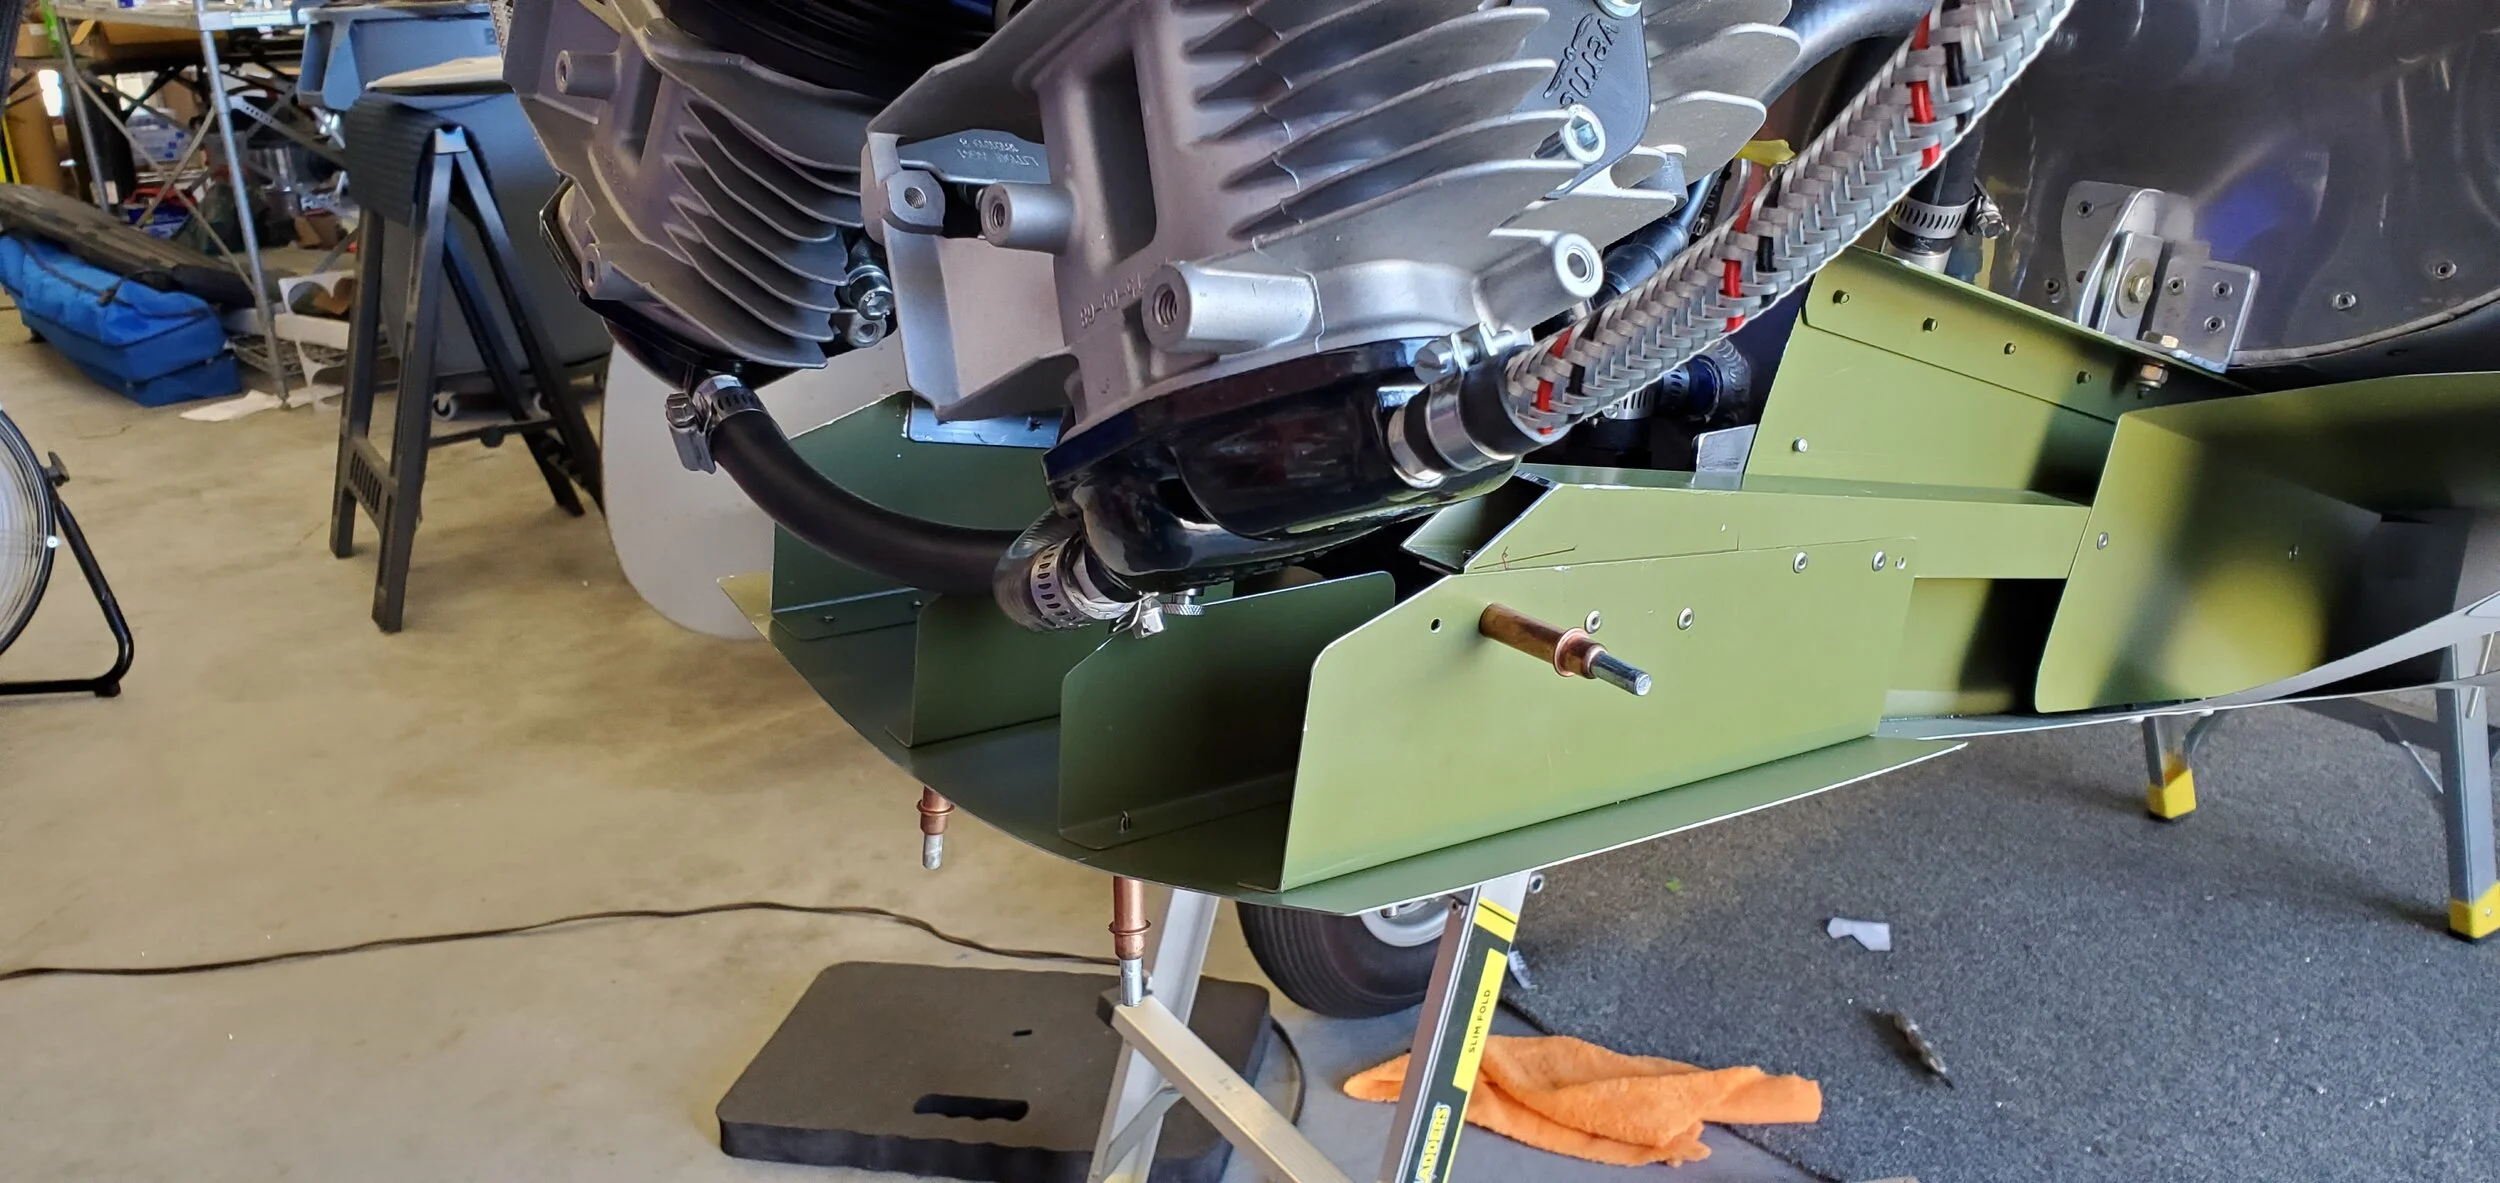
While waiting for the wheels (Matco is at full production and getting backed-up) we made the cowl flaps and are half-way done installing them. Looking awesome! They will be ground adjustable for now. Likely held full-open unless the engine is too cool. Scott did design an in-flight adjustable system for them. Will be an option for the kit. It is hard to retrofit that system with the current engine installation so likely won’t incorporate it into this airframe. Can readily make it into the design for the kit and adjust the engine installation to fit around it.

We are also waiting to run the engine again until we add a drain valve to the lowest exhaust pipe. #4 cylinder has a short section of the pipe that creates a low-point and any oil draining from the valve on that cylinder pools in that spot. Radial engines tend to have some oil draining by the piston rings as they sit parked. Especially on a new engine where the rings are not cut in yet. So I need my welder to add a stainless 1/8” npt threaded bung and then I will install a stainless tube and petcock drain valve. That should be sometime this week or weekend hopefully - everyone is either totally busy or out of work. Crazy times and it makes it very difficult to complete things. Then - back to running the engine and getting her dialed-in. Swap the gear legs and taxi her around!

Stay tuned!

All Fired Up!

Hey everbody! We are all fired up to finish our prototype. The engine and it’s systems are 100% complete as of yesterday. Filled her with aero oil. The prop is adjusted for initial runs. The brakes are operational. Our punch list is down to a few things. The big ones still to work on: cowl flaps, new scissor links for the gear legs, canopy latch, mount the wings and drill to final tight tolerance bolts, wing gap filler fairings, radio antenna cable bnc connectors, audio panel harness, mount gun blisters and iron sights.

The design for the cowl flaps is mostly done, same for the canopy latch. The scissor links are designed and ready to fabricate. We still need to design a drill fixture for the wing bolts drill and ream operation. These parts and fixtures should be completed over the next few weeks. Then weight and balance and prep everything for inspection. FAA registration paperwork was sent. We have our N number: N936SB.

Our progress after Oshkosh was slowed by external influences, those are not completely going away, but we are fighting thru them. Basically “resources” being stretched thin. For instance: Scott has been working heavy hours on other work that has tied up the mill and lathe. So we are waiting for an opportunity to machine the scissor links and canopy latch parts. The crew has also been busy with other obligations. I’ve been sick a couple times now - some kind of crud - don’t think it is Covid. Plus other obligations (family and external), etc… However, our plan is to work on the cowl flaps this week and get the engine fired-up.

Nothing standing in the way now for running the engine and making carb and prop adjustments. We don’t need cowl flaps - we wont have the cowl on anyway. We are planning to video our first start-up and show everyone a good look at the LiteFighter prototype. I can’t wait to hear her fire-off for the first time on our plane! Will post it on our YouTube channel. Be sure to like and subscribe! We will be posting a lot of videos as we get her going.

FYI - if you are interested in purchasing a kit of our LiteFighter P-40 or P-36, we are going to announce shortly that we are ready to accept initial deposits for them. This will be a $1,500 Refundable deposit. We wont touch the money until we announce the kits are going into production and you agree to purchase the first assemblies. Then it will be applied toward any of the kit assemblies, options, merch, etc… This initial deposit’s purpose is to inform us of the number of likely initial kit purchasers and help us determine how much capitol will be needed and how to structure our business. A few kits is pretty easy to do with our current methods and equipment, space available, etc... A bunch of kits is a different animal all together. Oshkosh showed us we have some serious potential for the later. By having the deposits in hand, it will allow us to seek the capitol needed for either scenario.

Again, we are fired-up! It is getting exciting! We have been waiting for this day to arrive - and it’s here!

Big things are in the works, keep checking in with us.

Full Steam Ahead

After a little bit of a break, we are back to working on the prototype. We have test fit the tacked-up exhaust collector ring and she fits perfectly. Before we could fit it up however, we had to finish the cowl mounting frame. So the last two weeks were working the cowl frame and the oil scoop. We added braces across the top of the cowling and then from the engine mount ring out to the front cowl support ring. The oil cooler scoop is integral to the lower cowling frame and needed to be installed to secure the lower end of the front support ring. Sorry, it is easier to show you than to explain it. Once all the bracing was installed, we could remove the temporary alignment fixtures from the exhaust ports on all the cylinders that were blocking the exhaust from mounting up. Those fixtures held the front ring and fiberglass nose-bowl in perfect relationship with the engine. After making all the brackets and braces, we primed and painted the cowling support frame to be the Federal Interior Green paint code of the rest of the cowling and cockpit areas..

While the paint was curing, we added the 14 spark plug wires to the engine installation. Quite the job! I used up about a half a bag of plastic tie-wraps and cut most of them off. I tried using some velcro strips on the frequently removed sections but they didn’t work as well as temporarily adding tie wraps. I hate to waste good materials but it was much easier than other methods to hold the wires in place. We have dual ignition on this engine and so had to make sure each plug wire was to the correct plug and routed neatly. Two wires on each set of 7 were at maximum length just trying to make it to their spark plugs. I am pretty happy with how they ended-up. Scott also machined the new carburetor throttle arm assembly and it fits perfectly. The stock S&S carburetor throttle arm is a dual-cable motorcycle style bracket with a return spring installed inverse to how you want it on an aircraft. If the cable breaks, you want full power. The S&S spring pulls it to idle. So we are modifying the throttle connection with a whole new bracket arm that will accept a standard aircraft throttle swivel end push/pull cable. After testing we will make that available to all Verner owners running the S&S carburetor.

Some of our team members and a lot of our customers have been getting sicknesses and recovering. Takes you down for about a week. Some are calling it the Oshkosh crud. Not really Covid, but sinus and stomach issues with heavy fatigue. Testing negative for Covid. Glad we are all vaccinated on the team just in case. That has slowed our return to full steam ahead. That and vacations and a hurricane or two. Any way, we are going to get back to full steam ahead this week. Throttle cable connection, choke cable connection, exhaust ring installation, electrical system testing, audio panel wiring and testing, avionics testing. Will also begin work on the cowl flaps. Then we pack up the plane and take her to the hangar for final assembly, weight and balance and ground testing. Then get ready for inspection and signoff. Shooting for end of September 2021. Will be super busy getting to that point.

What a Show!

We just returned home from Oshkosh AirVenture 2021. Just got in around 2AM Tuesday morning No issues on the return trip. We did catch a hotel Sunday night near South Bend.

We had quite the adventure! What a show for us! I want to thank all of you who stopped by our booth to check out our P-36/40 project and the Verner Motor radial engines. We are thrilled to have such a huge response to our LiteFighter line and the Verners! We reached our goal of signing up more than ten potential Beta kit builders and many, many more are now waiting for the standard kit offering. Wow! We are humbled to know there are so many with our same passion for the fighters of WW2 and sport aviation.

We also had many people inquire about the half scale B17 project. Yes, that is right. Half-scale B-17G. It will be a four to five seater with four Verner 7U engines. I will tell more very soon. The Bally Bomber was tied-down at the Brown Arch. It is only 1/3 scale and very difficult for even one person to fit into. However, Jack Bally proved it can be done. Half scale opens up many more possibilities for a useful aircraft. We have a family with B-17 roots who can support this mission and they are looking to find out how many other airframes might be produced for individuals, museums and organizations. Thank you folks for your interest. Contact Mel at: 650-419-7175 or HalfScaleB17@yahoo.com Let’s do it!

We had to drive out to Oshkosh from our base in Groton, CT. It took about 18 hours of driving our F150 super crew pulling a 20 ft box trailer - with a tire blow-out on the way. Likely ran over something and blew out the sidewall on a trailer tire. No harm to us or the vehicles/payload. Fixed it and kept rolling. No other incidents on the way or any coming back fortunately. However, we did have some crazy adventures!

We left Groton late - Saturday evening instead of Friday afternoon. We just had to finish and paint the cowling for the display = so was painting the cowl parts on Saturday morning after pulling a week of all-nighters. the whole week before we had painted the fairings, applied the decals, installed the ailerons and controls, many many final parts. Then, we had to drive non-stop to Oshkosh. Four drivers swapping out every couple hours. We made it to Oshkosh Sunday afternoon around 3:45pm. Setup went well and we had the plane all together and painted for the first time. Cheers! Hit the rental house and crashed - slept very soundly! Head just hit the pillow and then woke up in the morning - not knowing where I was or what was going on. Oh yah, Oshkosh!

Monday morning we hit the booth at 8am and had multiple customers there waiting for us! It never let up all week till Saturday afternoon and Sunday which were both busy with some lulls. An amazing amount of foot traffic through the booth! I think we might qualify for the dead grass award! We also had workers from the other vendors and kitplane companies stop by and check out the plane. We had many of our friends stop by to say hello and made many new ones. Aviation is such a small and close community.

Also during the week, we were interviewed by Aero News Network, EAA and Kitplanes. I have to thank them! Will link their articles and video’s when we get notified. Stay tuned!

Wednesday night was a crazy-wicked storm. Fortunately, it mostly missed the airport proper at Oshkosh. Just rain and lightning. It was forecasted to hit the show and everyone was quickly preparing for it. Aircraft were flying out and those that couldn’t, were getting jammed into any available hangar space. I saw P-51s and show planes covered in bubble wrap to deal with the predicted hail. Campers were being bussed to the museum for cover. We tied-down our plane double good and buttoned-up our tent not knowing what would become of it by morning. We headed to the rental house in Omro. That was a mistake! That is were the center of the super-cell hit at midnight. We had a straight line wind or tornado hit the property and took out 10 trees and cut power to the community. There were four tornados and 7 lives lost in cars in the local towns. The lighting in that storm was incredible! 3 to 4 bolts a second for an hour or more. The sound and reverberations were incredible. Everyone on our street was fortunate and all the falling trees just missed buildings and vehicles. Not so on the other side of the river we overlooked. Met a gentleman farmer a couple days later at the local tavern/pizza joint who lost his barn and garage to a tornado. It must have formed over us as he was directly down-wind from our place. 6th generation farm. Lots of memories and family stuff destroyed there. He was quite emotional - understandably. Again, we were fortunate and only lost power for two days. It was great to get it back on and able to wash laundry and ourselves.

Next day, the show didn’t skip a beat. Thursday opened up and all the warbirds and camper aircraft arrived back at AirVenture. Our booth was fine and full of people. Adventure!

Crew at Oshkosh: Sam and Karen, Scott, Nathan, Aaron, Oliver and last but certainly not least - Trevor.

Paul and Dave could not make it this time. Missed-out dudes! They had very good excuses.

Next - prep for engine start. We have to finish up the cowling work and throttle install. Making changes from the original idea. Also waiting for the exhaust to be welded-out. Our welder is working hard on finishing customer exhausts and it might be a bit. Will keep you informed and post video of our first engine run here shortly!

Sam Can't Come to the Blog Right Now

Greetings all. With one week to go before Oshkosh, figured I would provide you all with a little update, and as the title alludes to, Sam is busy working long days and late nights in the shop on the Prototype to get her done before AirVenture. We have made terrific progress the past few weeks. The plane is looking more and more like a flyable airframe. We have had one of the wettest and most humid Junes and Julys in recent memory, which has made painting a meteorological endeavor. Over the last few weeks we have finished laying up all of the composite and aluminum fairings; however, finding a clear day with low humidity (and no pollen) to paint has proven a challenge. Luckily we have had a few good days the past week and this weekend we were able to actually put the finishing touches all on the Hawk.

Another huge win since the last post was that we got in our prop! It looks great and and fits perfectly after Scott did some fine machining on the hub. The best part of a torque-y Verner radial is you can swing a [relatively] big prop. Between finishing the painting, the fairings, and the prop, the P-36 has some huge ramp appeal, despite its diminutive side.

Personally, I buttoned up the last of the electrical this week and ran some conductivity tests and everything seems in good order to run a start up test. I have also taught myself to use my wife’s Cricut to cut some of the smaller vinyl decals now that we have finished painting. Scott has been working on finalizing the mounting design of, and finishing the construction of, the nose cowling. The cowling has been a challenge as the complex geometry and various materials means it is only one part design and two parts artistry. Sam has been very patient with all of us as he has been teaching us everything from laying up fiberglass to match cutting tubing. The learning process on making this cowl will definitely go a long way towards us being able to provide a nearly finished and ready to install cowl on future kits; saving all of you the toil. Trevor and I finished the underside of the airplane and riveting the fairings on the wings, while Gary finished up the horizontal. Sam in all of this has been doing everything. I’m only writing this at midnight on a work night because when I left the shop an hour ago, he was just starting a new part for mounting the cowling, and I highly doubt he will get to this Blog when he is done.

The plan for this week is to finish the whole plane (easy, right?). We want to get it ready to show off at Oshkosh and be ready to start our test program in the weeks following. While we were hoping to be flying before the airshow, we still feel confident that we will be able to bring you a finished aircraft, even if it hasn’t flown yet. Still up for this week: finish the graphics, install the audio panel, attach the ailerons, finish, mount the cowling, and connect all of the thingamajigs to the whatchamacallits. All in all, not a horrible place to be after our last full week of work.

Feel free to share your love and support in the comments below, and if you will be at AirVenture be sure to stop by and check us out in the Homebuilt area.

Count-down!

Shame on me, I have not been keeping up with the blog. We are sprinting to Oshkosh with much to do yet. It is important to keep all of you up to speed on the project and plans. Aaron has updated our website recently and I hope you enjoy it. I’m getting good reviews/comments. There is a lot of content we will be adding as time allows us. I understand that we are a little shy on the project info. Will be addressed!

Sun N Fun was better than we thought it would be. I would guess about 70% of the crowd and vendors were there. They are saying record crowd on Saturday. I would agree. We did not bring the P-36 as it was too close to being done to take it apart and risk the road rash, and too far from done to really show it off. So we went with the Verner Motor only booth setup. We still had at least 8 customers who stopped in specifically to see the P-36. Many more were interested when they found out about it. Verner engine interest was strong and as good as any year we’ve been.

Project update: we have installed the new engine, it’s systems and are finishing up the electrical and avionics systems. Aaron is putting his robotics build experience to the test with the wiring. Doing great! We have installed the aileron controls in the center-section of the wing. The control stick had too much side to side play. We fixed that with milling out the welded-in tube and welding in a new, larger tube that uses flanged bushings. We also 3D printed an Army style stick grip and are installing it onto the control stick. Looks and feels great! We added the radio, transponder, ELT and electrical switches, breakers and ignition system controls onto a new panel, beneath the instrument panel. Very much like a P-40 has - the P-36 had it’s switches on the side panels and that is not good for in-advertent bumping with your leg. We had the leg room to spare with the panel so there it went. We will add an arm rest for the throttle on the left side and a COM box and panel on the right side of the cockpit.

Along with the switch and radios panel, we have run all of the antenna, trim and lighting wiring and installed the components. We also ran the engine sensors and ignition wiring, voltage regulator, battery, solenoid, buses, wired up the panel and gauges too. Big job! Not as big as some of you folks do with the RV’s and fast glass for sure. We installed the fuel lines to the carburetor, installed the fire-proof poke-thru’s in the stainless firewall. Ran the oil hoses, cooler, separator and breather line too. We are right at the point of closing up the belly of the aircraft for the last time and finishing the fairings along the bottom of the wings. We are also about to tackle the cowling and it’s support frame - as well as the cowl flaps. The three blade ground adjustable prop is ordered and we are holding our breath it gets done in time. They are promising it will be here on time, so it will be a nail-biter! We went with NR Prop in Ukraine. Good things are being said and they have the right shape and diameter. For direct-drive, higher hp engines, they make the blade of carbon fiber. Our backup is the Warp Drive which is excellent - it’s just not the WW2 shape. Rounding the tips helps though. We may buy one to be sure to have a prop at AirVenture 2021 and to compare in-flight performance after the show. Still deciding on that, but time is running out.

We are currently working the throttle and choke cable connections, painting the smaller components and panels, and completing the 3D modeling of the cowling and sub-frame with the latest thinking. Our welder is catching up on engine mounts and exhausts for our customers and will jump on our exhaust right away for the show. I am hoping to have the cowl, cowl flaps, wing root fairings and tail fairings ready to paint by 4th of July. Decals and paint stencils after that. The count-down is on to Oshkosh! Our crew is on it!

The Twist

Spring is trying to break through here in the Northeast, but not quite able to shake that winter chill. April just arrived and we have been working all of March on prepping for a new engine. Foremost was dealing with our landing gear. The third time I believe. This time, we had a nagging toe-in twist when the full weight of the aircraft was put to them. Studying it carefully, it was a combination of two things. The teflon liners inside the main tube had been relieved to allow the gear to easily slide with the spring motion. Well, we had given it too much clearance and that allowed the whole lower leg to pivot off center slightly. That little amount of sloppiness exacerbated the little bit of miss-alignment that I had welded-in on the scissor-links. Allowing the wheels to still toe-in a little bit. Barely noticable, but I don’t like it. One side slightly more than the other as well. Dang it!

After removing the engine to crate it for shipping to it’s new owner, we put the A frame back onto the engine mount and removed the landing gear. Scott studied the issue with the sleeves and ordered new teflon tubes. They arrived and were undersized on the ID. He then created a special reamer to take out the .010” all-around needed for the lower leg shaft to slide inside smoothly with no binding. The front of the reamer is the same as the id on the existing tube. Then he tapered out to the final ID we want and added cutting flutes. It worked, but clogged with chips quickly. Modifying this to allow the chips to exit also messed up the surface finish. Made a second reamer more like the original but shorter. This did a great job. It did take some time and careful drill work. We are just about done with the landing gear - again. We will be doing some careful milling and drilling of the scissor link upper mounting lugs to get them to track the wheels better. A little milling, a little paint, makes her what she aint. I am planning to get that done this first weekend in April in order to be able to put the gear back on and remove the A frame.

At the same time of working on the landing gear, we have been fabricating the fuel pumps panel assembly and installing it and the rest of the fuel hoses and tubing in the fuselage. It is 99% complete from firewall to the fuel tanks. Just one little thing left - adding the low point drain. That will be doable after we get the landing gear on and install the bottom skin and tunnel. Then, I can work from above the seat and below. Its a sequence thing.

Also have been working on the electrical system. Installing wiring and loom for fuel senders, landing and navigation lights. Made plywood mounting panel for the battery, solenoids and terminal blocks. They will fit up in the gun deck between the machine guns and on top of the forward fuselage frame bracing. I am finishing up the electrical schematic to know just how many switches and circuit breakers we will need a home for.

One more thing we have been working on is the tail and wing fairings. We had Jack Charles of Madison, WI English wheel our fairings for us. He was eager to try it - being a metal smith shop teacher for a high school and technical college. We sent him templates and descriptions of how much to roll and where. They came out very well. Excellent for only written descriptions and images. That is a tough thing to do and he did great! I trimmed and located the fiberglass trailing edge of the wing root fairings, drilling them when just where I wanted them. That plastic exterior painters tape did great for holding everything in place. The sheet metal fairing panels were then taped into location and adjusted as necessary. When good, I drilled and cleco’ed them to the wing and fuselage.

I used what seemed like a bunch of clecos to do it. I was kind of disgusted with my work thinking I had too tight of hole spacing, until I looked back at the reference photos. Curtiss had done the same thing on the real P-36. Lots of screws in the fairings and so ours looks right after-all. Back when we made the large trailing edge fiberglass pieces, we had made small fiberglass fairings for the leading edge of the wing where it gets seriously compound and tight. These were not the right shape after installing the sheetmetal fairing panels. The leading edge of the tail surfaces is another very tricky spot and we did not make a fiberglass piece for that. Thought about it long and hard and I want to try to pound out a soft annealed sheet metal leading edge. Ordered plenty of soft sheet and am about to get on that project. Getting those pieces done will allow me to finish the bottom section of the wing root fairings. Shouldn’t take too long. Adding the wing root fairings makes it look so much better! I can’t wait to paint them and see it with the wings and cowl.

Oh yah, Rob Walty made us our four quadrant cowling side panels and the nose bowl. We will be ready to start working on the cowl shortly. April and May will be really fun work!

We will be at Sun N Fun 2021 in a couple weeks. Our booth is in front of Building A and B along the main thoroughfare. Look up N68 on the exhibitor map. Sorry, we will not have the plane there. Way too close to flying to dismantle it and risk the trailer rash of hauling it both ways. We will have a brand new Verner Motor 9S radial engine on display. Our customer for that engine, Bob Beaty is #2 at the Sun ‘n Fun organization. He twisted my arm to have it on display. So after not planning to attend, we will. If you are going, please stop by and say hello. Love to talk with you. Then, right back to work right after we get back.

Copyright © 2024 ScaleBirds LLC  |  All Rights Reserved